





By Jules Rhee 5/28/2026
Learn the science of math and how to use it to teach multi-digit multiplication in 4th and 5th grade. Includes four research-based strategies and a step-by-step lesson plan.
I’ll be honest. It was only a couple of years ago that I ever heard the term “science of math.”
And when I did, my first reaction was basically, isn’t all math science?
But it’s actually about the research behind how students’ brains learn math. And once you understand the basics, it’s hard not to see it everywhere in your classroom.
That’s where the science of math can help you understand why some of your most reliable strategies work so well, and what small shifts can make a big difference for students who are stuck.

What Is the Science of Math, Anyway?
The science of math (sometimes called “the science of math learning”) is research from science and educational psychology that tells us how the brain processes, stores, and retrieves mathematical information.
Some people refer to it as the instruction manual your students didn’t come with.
It’s not a single method or program. It’s a set of ideas or principles, backed by decades of research, that explain why some teaching strategies work and others don’t.
A few of the big ideas:
- Working memory is limited. Students can only hold so much in their heads at once. When a lesson demands too much at the same time, like remembering the steps and lining up the numbers and keeping track of regrouping, the math part often gets lost.
- Teach concrete before abstract. Students understand new concepts best when they start with something they can see or touch, then move to pictures, and then to numbers and symbols. Jumping straight to the algorithm skips the steps that build real understanding.
- Practice doesn’t work the way we think. Twenty problems in a row feels like solid practice. But research actually shows that short, spaced-out practice over multiple days builds stronger retention than one long session.
- Seeing a worked example first beats “figure it out” problems. Before students practice independently, they learn more from studying a completed, step-by-step example than from jumping into their own problems cold.
These aren’t teaching fads. They’re based on how memory works, and once you understand them, you’ll see how they make sense.
How Is This Different from a Typical Lesson?
Here’s a comparison that might help.
A typical multiplication lesson might look like this:
- The teacher explains the algorithm (“First you multiply the ones…”)
- The teacher demonstrates a couple of examples on the board
- Students practice 15–20 problems independently
- Homework assigned
- Next day: move on
There’s nothing wrong with this structure. But it doesn’t consider working memory limits, it skips the concrete and visual stages, and the practice is massed all at once instead of spaced out over time.
A science-based lesson looks a little different:
- Activate what students already know (connect new learning to something familiar)
- Start concrete or visual before moving to the algorithm
- Model with a think-aloud, not just a demonstration. Students benefit from hearing your reasoning as you explain the steps
- Guided practice with scaffolds that reduce the mental load, like visual organizers or graph paper grids
- Brief retrieval check at the end – students explain the steps in their own words
- Plan for review – make sure this skill is repeated and reviewed multiple times in the future.
The content is the same, but the sequence and delivery are what change.
That change can make a big difference for students, especially strugglers.
The 4 Science Principles Behind Multiplication Lessons That Stick
1. Reduce Cognitive Load
Think of your students’ working memory like a cup. It only holds so much at one time. When kids are trying to remember the steps, line up their numbers, AND keep track of regrouping all at once — that cup overflows. And when it does, the actual math gets lost.
What this looks like in your classroom: Use visual organizers, color-coding, or graph paper grids to help with the organizing part. That way, the structure is built in, and students can focus on the math instead of trying to remember the steps and where numbers should be written. That’s basically what Shape Visual Organizers are designed to do. The shapes show the structure in a step-by-step way, so kids can focus on the math.
2. Follow the Concrete-Pictorial-Abstract (CPA) Progression
CPA is just a fancy way of saying: start with the real thing, then draw it, then write it.
Concrete = students touch and move physical objects. Think base-ten blocks, fraction bars, or literally grouping cubes on a desk.
Pictorial = students see a picture or drawing of the math. An area model, a number line, or a drawing of 3 groups of 12 dots.
Abstract = the symbols and equations you see in most math books. Like 45 × 73 = ___.
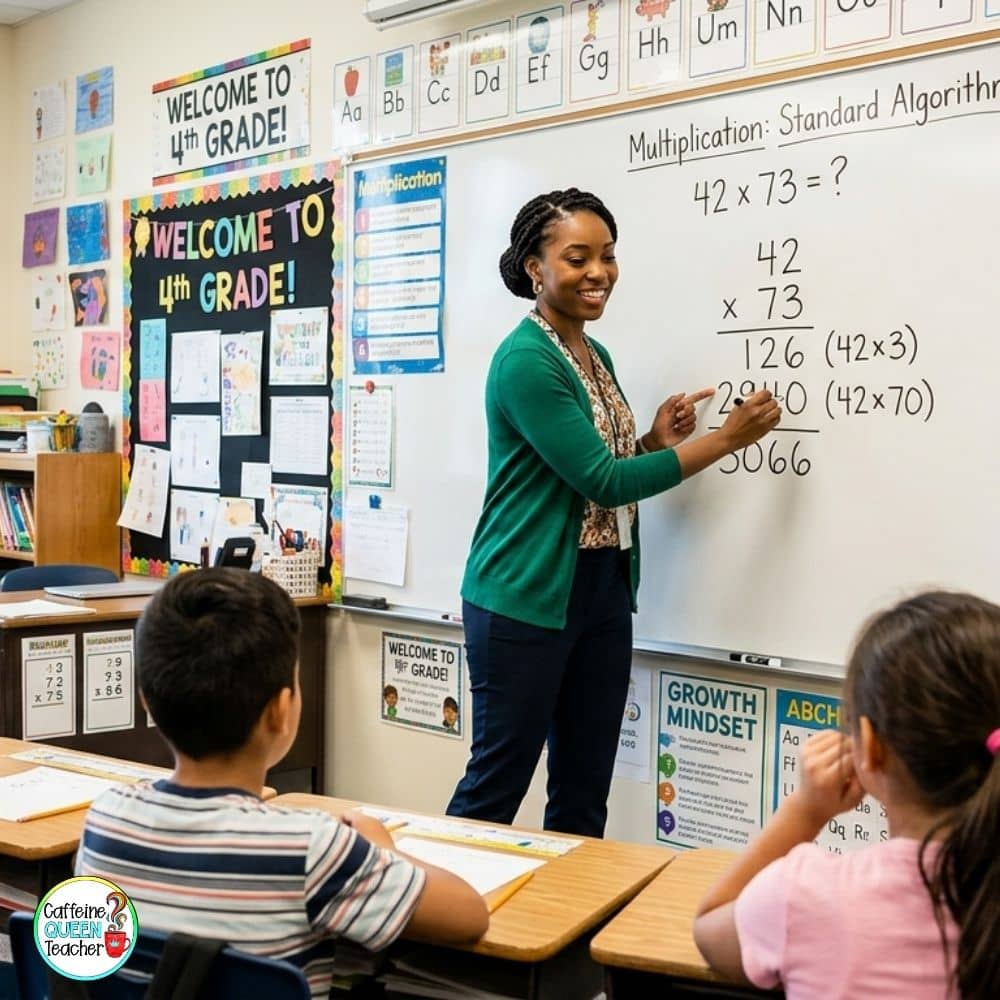
The problem is that most math instruction jumps straight to the abstract. And some kids figure it out anyway, but they’re following steps, not really understanding what’s happening. When students go through all three stages first, the algorithm actually means something to them instead of just being a procedure to memorize.
What this looks like in your classroom: Before you introduce the standard algorithm for multi-digit multiplication, draw a quick area model on the board and walk through it together. Show them where the partial products come from. Then introduce the algorithm, and make the connection explicit: “See how we got four partial products in the area model? Watch how the same thing happens when we use the algorithm.” That moment of connection is what turns just following steps into real understanding.
3. Show a Worked Example Before Independent Practice
This one is simple: finish a problem completely in front of students before you ask them to do one on their own.
Research shows that students learn more from studying a finished, worked-out example than from jumping into new problems cold — especially when a concept is brand new. The key is thinking out loud while you do it, so students hear your reasoning, not just your steps.
Most of us demonstrate and then hand out practice. This is the same thing, just slower. You’re not moving on until students have seen the whole thing, start to finish, with your thinking narrated out loud.
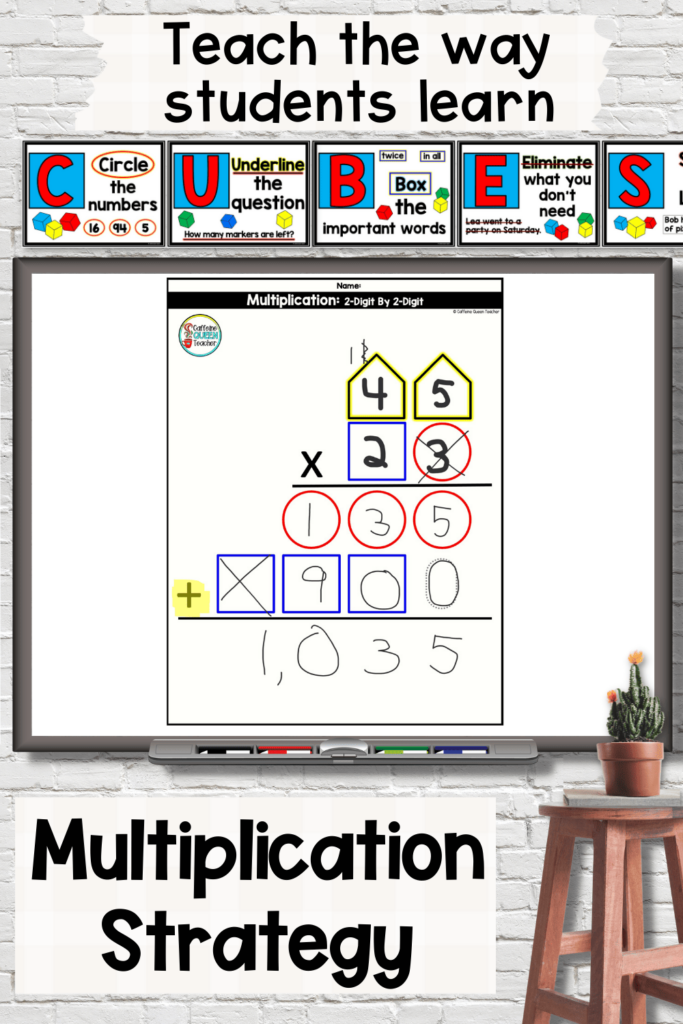
What this looks like in your classroom: Work through one complete problem while talking through every decision. Not just what you’re writing, but why it goes there. Something like: “I’m multiplying by the 3 in the ones place first, so that product goes in the red circle. Circles go with circles!” Then have students do that exact same problem on their own right after. Same problem, not a new one. That repetition is the point.
4. Space Out Practice and Use Retrieval
Here’s the short version: a little practice spread across several days beats a lot of practice crammed into one.
Twenty problems in one sitting feels productive. But research shows it fades faster than you’d think. Students who do 5 problems today, 5 tomorrow, and a quick review later in the week will remember it longer than kids who did 20 in one session and didn’t see it again until the test.
Retrieval practice is the other piece. That just means asking students to pull information out of their brain instead of looking it up or watching you do it again. It sounds small, but it’s one of the most effective memory-building tools out there.
What this looks like in your classroom: End the lesson with a 2-minute brain dump where students write down the steps in their own words without looking at anything. Start the next day with 2-3 review problems before moving on. Keep looping back to multiplication throughout the week, not just the day you taught it.
Sample Lesson Plan: 4th Grade Multi-Digit Multiplication
Topic: 2-Digit × 2-Digit Multiplication (Standard Algorithm) Grade: 4th Grade Time: 60 minutes Materials: Base-ten blocks, Shape Visual Organizers (color version), dry-erase markers + sleeves, whiteboards
Warm-Up (5 minutes) — Activate Prior Knowledge
Before jumping into 2-digit × 2-digit multiplication, take five minutes to review 2-digit × 1-digit multiplication first. This is a quick way to see where students are before the new lesson starts.
Give students two problems on their whiteboards. Something like:
“Show me 23 × 4 using your organizer.”
Students solve and hold up their boards. Pull 2–3 popsicle sticks and ask those students to explain how they got their answers. You’re just checking whether the foundation is solid before you teach the next level up.
If several students are struggling with 1-digit problems, that’s useful information before you move into 2-digit × 2-digit.
Concept Introduction (10 minutes) — Concrete/Visual First
This is the concrete/visual step before you introduce the standard algorithm for 2-digit multiplication.
Draw an area model for 45 × 73 on the board and break it into a grid:
- 40 × 70 = 2800
- 40 × 3 = 120
- 5 × 70 = 350
- 5 × 3 = 15
- Total: 3,285
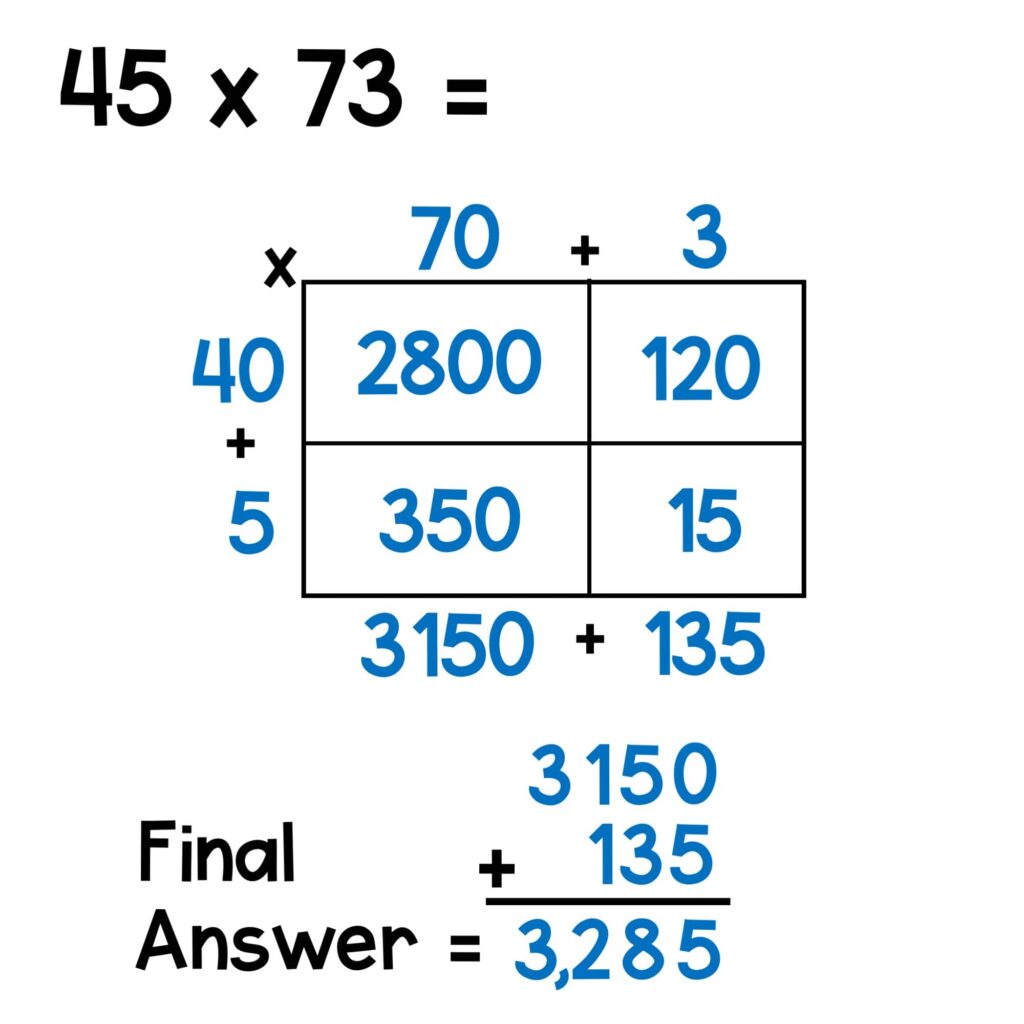
Tell students: “This is the math we’re about to do. We’re breaking the numbers into parts and multiplying each piece. The algorithm we’re going to learn is just a faster way to do this same thing.”
Spending a few minutes here before teaching the algorithm helps students actually understand multi-digit multiplication instead of just memorizing steps. For kids who struggle with abstract math, seeing the partial products laid out visually first makes everything that follows easier to follow.
Worked Example + Think-Aloud (10 minutes) – Teach with the Organizer
Now bring up the 2-digit × 2-digit Shape Visual Organizer on your SmartBoard and work through 45 × 73 out loud, step by step.
Don’t just fill in the organizer; narrate every decision as you go.
“I see the 3 in the red circle. That’s the ones digit in my bottom number. I’m going to multiply 3 by each digit in the top number, and put all the products in the red circles below. Circles go with circles!”
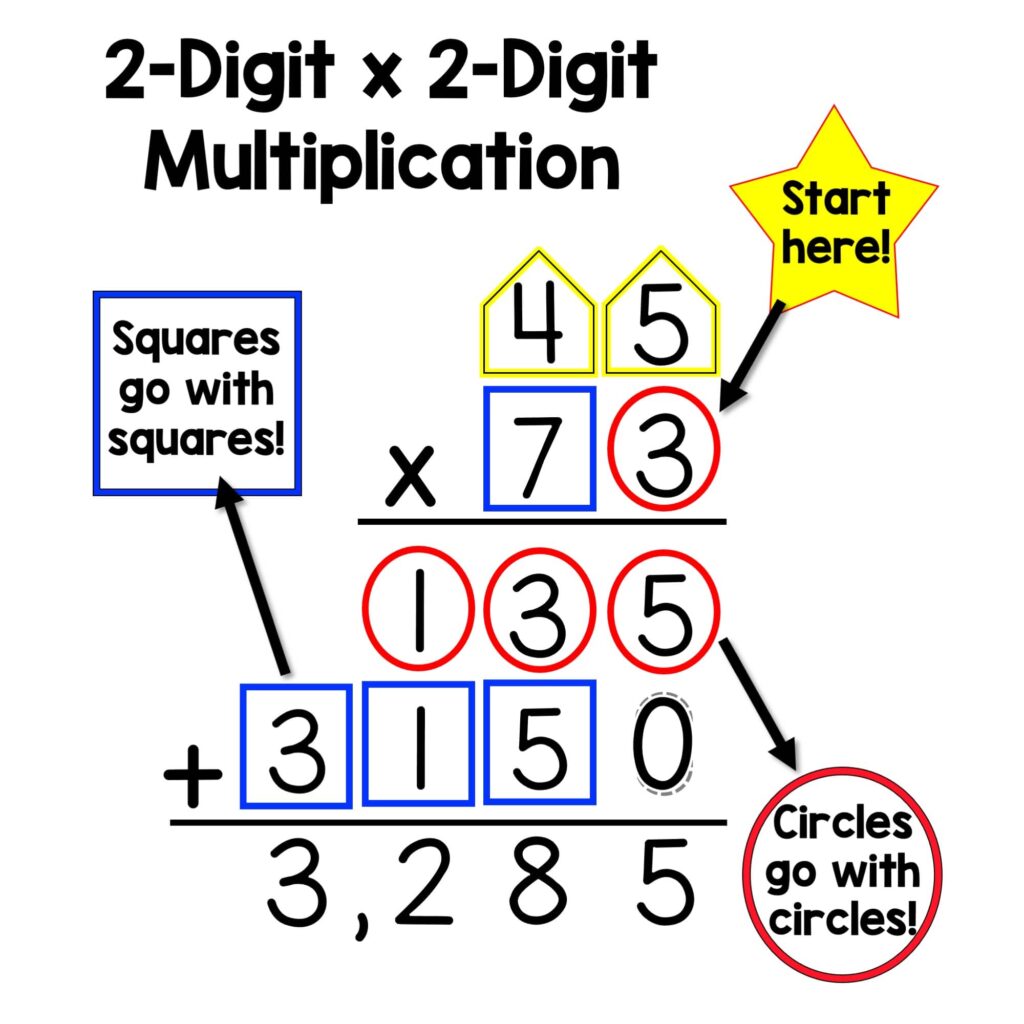
Work through each partial product, then move to the tens digit.
“Now I’m multiplying by the 7 in the blue square, so those products go in the blue squares. Squares go with squares!”
While you model on the board, students follow along on their own organizer inside a dry-erase sleeve. They can fill in the same problem at their desks as you go.
Ask guiding questions as you demonstrate the problem: “What do I multiply next?” and “Where does this product go?”
This is the worked example step from the science of math, and it’s more effective because students hear the thinking behind each move, instead of just seeing the answer.
Want ready-to-print differentiated 2-digit by 2-digit worksheets and organizers? You can grab this resource at my TPT store!
Guided Practice (15 minutes) – Scaffolded, Not Solo
Students work through 3 problems using the full-color Shape Visual Organizer. Walk around the room while they work and look for a few things:
- Who’s following the color and shape pattern correctly?
- Who’s losing track of which digit goes where?
- Who’s ready to lose the first scaffold and try the black-and-white version (instead of the colored version)?
If you have students who are stuck, pull a small group to your back table and work out a few more think-aloud problems with them. If you have students who get it and are ready for the next level, hand them a black-and-white organizer and let them keep going.
The built-in scaffolding of the organizer makes it easy to differentiate 2-digit multiplication practice without needing to prep separate materials.
Partner Check + Retrieval Practice (10 minutes)
Have students turn to a partner and take turns explaining: “What are the steps in 2-digit multiplication? Explain it like I’ve never seen it before.”
Two minutes each. Then pull a few popsicle sticks and ask those students to share what their partner said.
After that, give everyone a sticky note. Students write down the steps in their own words without help or looking at anything. Collect them when they’re done. You now have a quick read on who’s got it and who needs more support tomorrow. And it took zero extra prep!
Closing + Spaced Practice Preview (5 minutes)
Before you wrap up, loop back to the area model from the beginning of the lesson.
“Remember those four boxes we drew on the board? Each one of those was a partial product. That’s exactly what we just calculated with the organizer.”
Making that connection out loud between the visual model and the algorithm is what helps students see that the standard algorithm isn’t just a set of random steps. It’s the same math they already did, just written differently.
Then give students a heads up: “Tomorrow we’re going to start with two of these problems as a warm-up. The more we practice over these next few days, the better it sticks.”
Independent Practice (Homework or Next-Day Warm-Up)
Assign 4–5 problems using the color organizer.
On Day 2, open class with those same problems as a retrieval warm-up before students check their work and self-correct. That one small move, coming back to yesterday’s problems before moving forward, is one of the easiest ways to build spaced practice into a packed schedule.
Frequently Asked Questions
Do I have to teach the area model every time?
Not for every lesson, but it’s worth doing at the start of the unit. Once students understand what the algorithm is representing, you can move straight to the organizer from then on. The area model is just there to build the foundation.
What if my students already learned the algorithm without these supports?
You can still bring in the Shape Visual Organizers as a re-teaching tool. Frame it as a new strategy, not a correction. A lot of students who struggled with the standard algorithm for multi-digit multiplication find that the color-coding and shapes make the steps finally click.
How do I fit spaced practice into an already packed schedule?
Keep it small. Two or three problems at the start of class, a few times a week, rotating between new content and things you’ve already taught. That’s it. It takes five minutes and tends to work better than re-teaching the whole lesson when students forget.
Is this approach only for struggling learners?
No, the science of math principles work for all students. Kids who pick things up quickly just move through the concrete and visual stages faster. They gain a deeper understanding of why the algorithm works, which pays off later when the math gets harder.
How does this connect to Shape Visual Organizers?
Remember the cognitive load principle, which is the idea that students’ brains can only handle so much at once? That’s exactly what the organizers are designed for. The color-coded shapes take care of the “where does this go?” part of the problem, so students aren’t trying to tackle the organization part and do the math at the same time. When the structure is built into the organizer, students can put all their focus on the actual multiplication. That’s why they work, especially for kids who have been struggling with multi-digit multiplication for a while.
Want ready-to-print differentiated 2-digit by 2-digit worksheets and organizers? You can grab this resource at my TPT store!
Wrapping Up
The science of math isn’t a new curriculum or a program to buy. It’s just a set of research-backed principles that explain why some lessons stick and others don’t. It also explains what you can do differently to help more students get there.
None of this requires starting over or throwing out what you already do. You’re probably already using most of these strategies. The difference is mostly about order, like introducing visuals before the algorithm, showing a complete worked example before independent practice, and coming back to the skill over several days instead of just the day you teach it.
And for the students who’ve been struggling with multi-digit multiplication? Those small shifts can make a real difference.
Want to try Shape Visual Organizers? Check out this best selling multiplication set on TPT →

Check out the multiplication workbook on Amazon featuring visual multiplication organizers, graph paper grids, and independent practice!
More Articles You Might Like:
How to Teach Long Multiplication and Long Division
3 Ideas for Teaching Multi-Digit Multiplication
About the Author
Written by Jules Rhee, MEd, and a 30-year teaching veteran; published 5/28/2026.
Jules is the creator of Caffeine Queen Teacher (CQT) – Visual Math Organizers + Graph Paper Support. She’s a veteran teacher with over 30 years of classroom experience (SPED, upper elementary, and middle school) and a Master’s in Education (MEd). Jules shares practical, classroom-tested ideas and creates step-by-step resources that help students stay organized, confident, and successful – especially with multiplication and long division.
Read more about Jules here: About Page | Browse resources here: TpT Store