


By Jules Rhee | 2/12/2026
Teach students to read math word problems like reading passages. This step-by-step markup routine helps 3rd – 5th graders slow down, eliminate extra info, and boost accuracy – great for test prep in upper elementary, special education, and homeschool.
You know that moment.
A student looks at you with total confidence, says, “I know how to do this. This is easy!” and then… gets it wrong.
Not because they can’t do the math.
Because they didn’t actually read the word problem.
They grabbed the first numbers they saw, guessed at the operation, and went full speed ahead into solving the problem.
So let’s talk about a skill that doesn’t get taught enough, but boosts accuracy (especially on tests):
Teaching kids to “read” math questions by marking them up.
Just like we do in reading class.

Why students miss problems they actually know
Kids often get problems wrong because they rush through the words, not because they can’t do the math. They just don’t take the time to slow down, read the problem, and think through a plan.
Here’s what I saw constantly in upper elementary:
- They don’t even read the problem
- They rush and don’t pause to understand what’s being asked
- They circle every number just because it’s a number
- They ignore the last sentence (which usually tells them what to do)
- They get derailed by “keyword traps” (we’ll talk more about this later)
- They lose track of steps in multi-step work (yep, like long division)
If your students can solve problems during guided practice but fall apart on independent work, word problems, or tests, this is often why.
The fix isn’t to “try harder.”
The fix is slow down and read with a plan.
The big goal here is to slow students down so they think first – not just grab numbers and go. So be sure to teach this during test prep season.
The mindset shift: Teach Word Problems Like You Teach Reading
In reading, we teach students to interact with the text – underline what matters, circle what’s confusing, and pay attention to the question at the end.
Math word problems are no different. Students can mark up numbers, units, clue words, and steps so they know what the problem is asking before they start calculating.
Marking up math gives students a clear plan to follow instead of a wild guess.
They start acting like detectives.
The simple markup routine that makes kids more accurate
I like to keep this routine predictable. Same moves, every time.
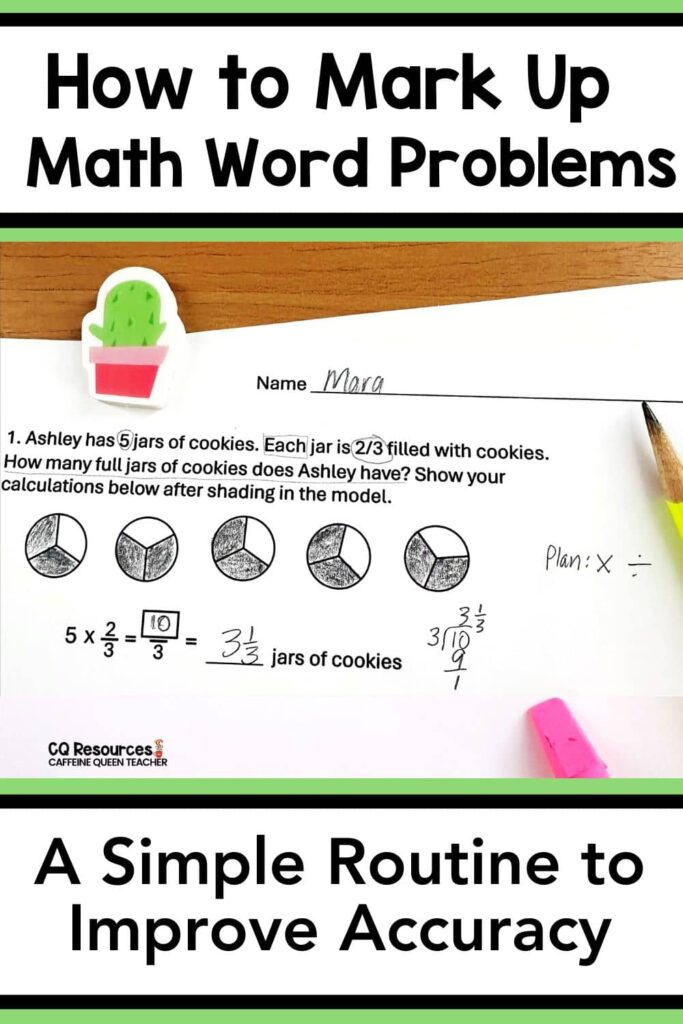
Step 1 – Circle the numbers that matter
Students circle the numbers they will actually use.
Then (this is key), they add a tiny label above each number.
- 24 cupcakes
- 6 students
- 3 days
That one tiny label does a lot of heavy lifting. It slows them down just enough to think.
And, here’s the part that always surprises kids:
Many students are surprised to learn that they might not use every number in a word problem.
Sometimes students need to eliminate extra information. That’s why we circle only the numbers we’ll actually use.
Step 2 – Box operation clues
Students draw a box around clue words (total, each, left, shared equally, etc.) BUT…
Here’s the line I always said:
“Clue words help – but they don’t decide.”
The question decides.
And yes, this is where some teachers like to teach CUBE or CUBES. If you use that strategy, it’s the perfect way to mark up word problems.

Step 3 – Underline what the question is asking
This is the move that stops 80% of “I did the math but still got it wrong.”
I tell them, “The last sentence is usually the boss. That’s the part that tells you what you’re actually solving for.”
They need to underline the part that tells them what to answer.
Then they finish this sentence:
“I need to find…”
If they can’t say what they’re finding, they’re not ready to solve.
This is the part that can feel slow at first – and that’s normal. Spend extra time here until students truly understand what the question is asking. If you rush this step, they’ll keep missing problems even when they know the math.
I model it out loud first: “I need to find how many ___,” “I need to find the total ___,” or “I need to find how many are in each group.”
A few quick teacher lines that help:
- “What is the problem asking you to figure out?”
- “What will your answer be about?”
- “Start with ‘I need to find…’ and include the unit.”
Sometimes I add one extra step that really clears things up: I have them write a second line to keep their brain on track:
“My answer should be a number of ___.”
If a student can’t say what they’re finding, I don’t let them pick up their pencils yet.
We reread the question together until they can say it clearly. It’s not being picky; it’s how we stop them from doing a whole page of math calculations for the wrong question.
Step 4 – Write a mini plan
Right next to the problem, students write:
- Plan: ________
It can be as simple as:
- Plan: multiply then subtract
- Plan: divide to find each group
- Plan: solve step 1, then use the answer to solve step 2
This turns guessing into thinking.
Step 5 – Box the answer and label it
Students box their final answer and add the unit.
48 miles
$12
6 students
No unit = suspicious answer.
What this looks like in real life
Let’s walk through a few examples the way you’d model them on the document camera.
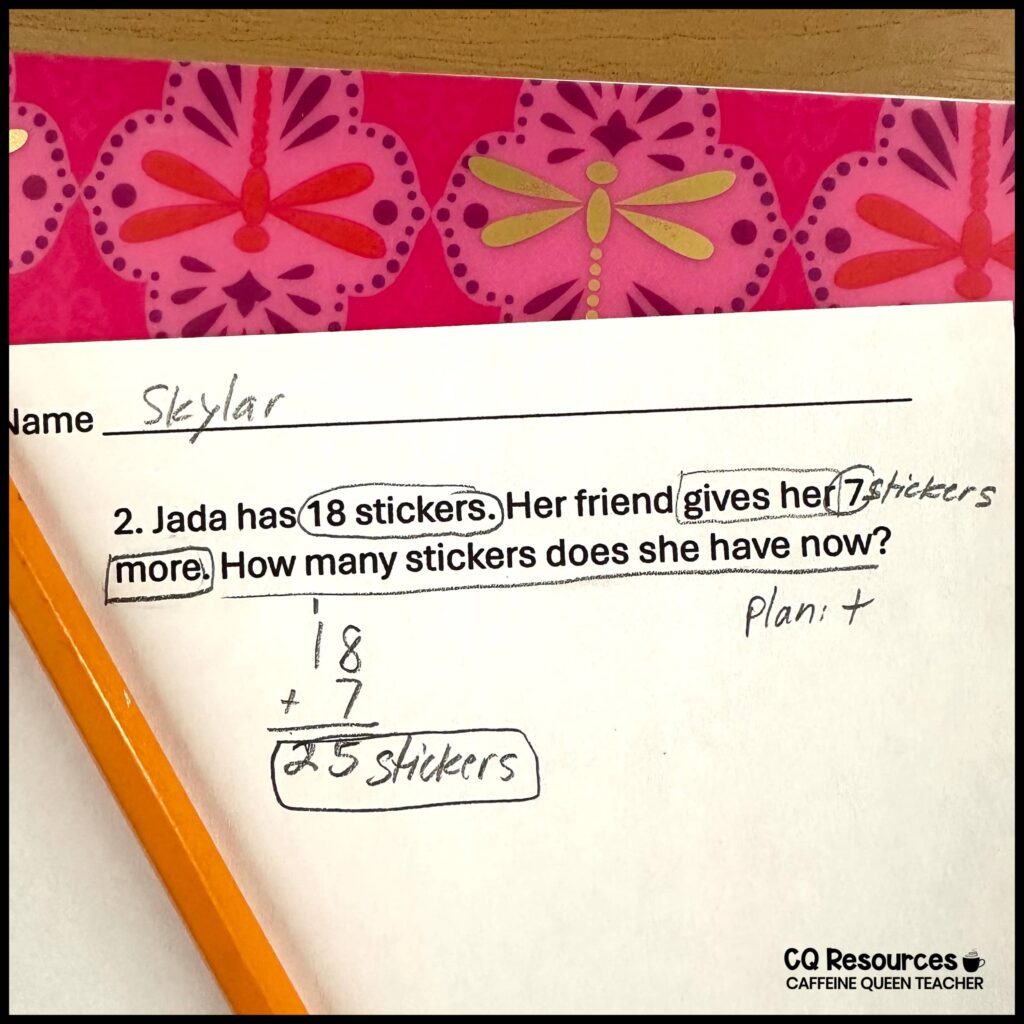
Example 1 – One-step word problem
Problem:
Jada has 18 stickers. Her friend gives her 7 more. How many stickers does she have now?
Markup:
- Circle 18 and 7
- Label them: 18 stickers, 7 stickers
- Box “gives her” (clue)
- Underline: “How many stickers does she have now?”
- Plan: add
- Solve: 18 + 7 = 25
- Box and label: 25 stickers
This takes about 30 seconds once kids learn the routine.
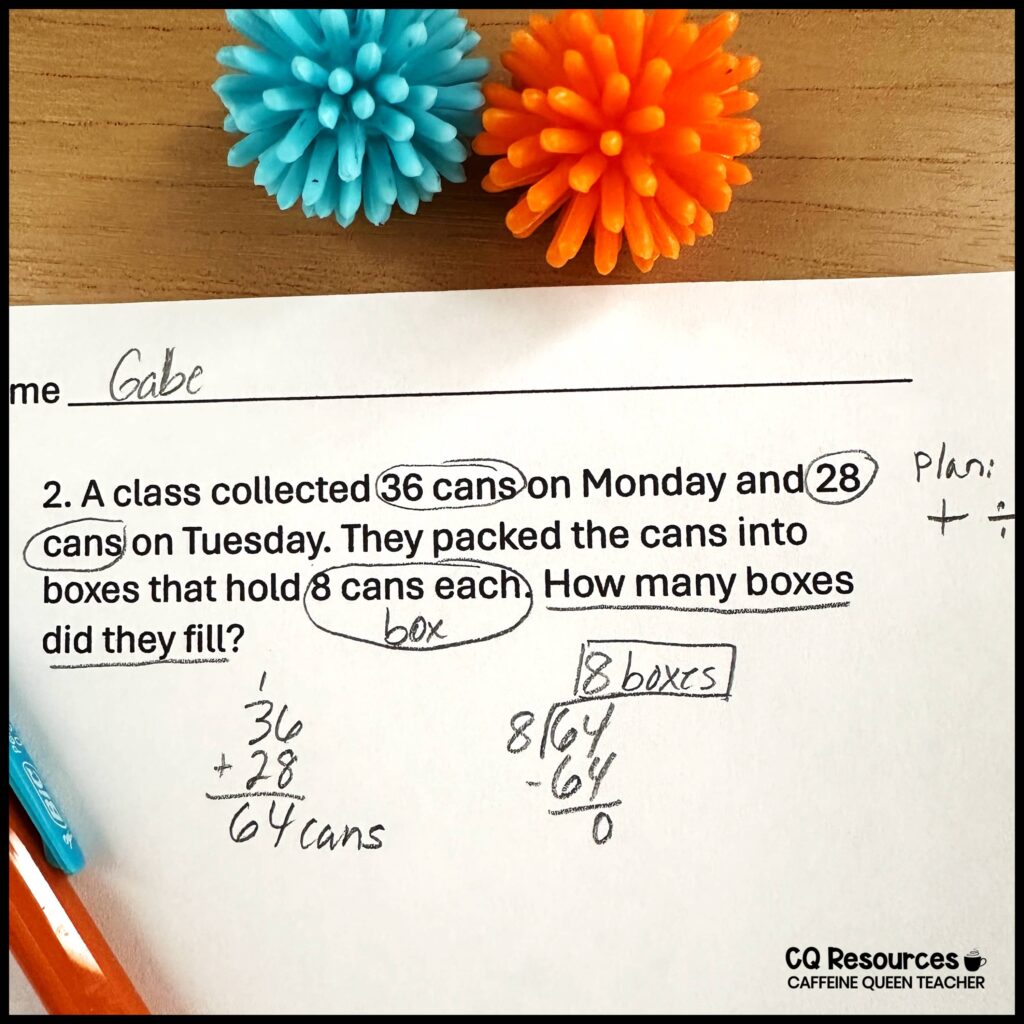
Example 2 – Two-step word problem (classic word problem trap)
Problem:
A class collected 36 cans on Monday and 28 cans on Tuesday. They packed the cans into boxes that hold 8 cans each. How many boxes did they fill?
Markup:
- Circle 36, 28, 8
- Label: 36 cans, 28 cans, 8 cans per box
- Underline: “How many boxes did they fill?”
- Plan: add then divide
Step 1: 36 + 28 = 64 cans
Step 2: 64 ÷ 8 = 8 boxes
Box and label: 8 boxes
Some students will divide right away because they see “8 in each box.” The plan reminds them they have to find the total cans first.
Sometimes kids latch onto one word and pick the wrong operation. The plan forces them to slow down and realize it’s a 2-step problem.
Example 3 – Multi-step with long division (where marking up questions really pays off)
Long division is one of the best places to teach question markup because kids can lose their place fast. And when they lose their place, they become frustrated.
Problem:
A teacher has 156 pencils to share equally among 6 groups. How many pencils are in each group?
Markup:
- Circle 156 and 6
- Label: 156 pencils, 6 groups
- Underline: “How many pencils are in each group?”
- Plan: divide
Now the real win: long division is where students often know what to do, but the steps get scrambled. That’s why some students benefit from supports like shape organizers, grid paper, or visual step tracking.
Shape organizers help because each step has its own “home.” When students place digits and partial answers into specific shapes, it cuts down on skipping steps and accidentally writing numbers in the wrong place.

Grid paper helps for a different reason: it keeps everything lined up. When digits stay in their own boxes, students are less likely to bring down the wrong number, drift off place value, or stack numbers unevenly during subtraction.

You can also teach students to visually track their long division steps:
- Write the division setup neatly
- Draw a small checkmark or check box next to each step (divide, multiply, subtract, bring down)
- Or number the steps down the side: 1, 2, 3, 4
The math matters, obviously. But the tracking matters too. Because in long division, the work can be correct and the answer can still be wrong if a student brings down the wrong digit or skips a step.
Question markup + tracking the steps turns long division into a process they can trust.
Two Supports That Help Students Stop Rushing: CUBES + a Simple Plan
If you want students to mark up math questions consistently, it helps to give them a routine they can repeat every time. Two simple supports that work well are the CUBES (or CUBE/CUBED) strategy and a step-by-step problem-solving plan.
CUBES gives students a clear way to interact with the words in the problem before they touch the math. It builds the habit of slowing down, paying attention to what matters, and spotting what the question is really asking.
A step-by-step plan helps with the next part: turning the information into a process. This matters most with multi-step problems, because students often jump to a random operation and hope it works. A quick structure like this keeps them focused:
- Step 1: What do I need to do first?
- Step 2: What do I do next?
- Step 3 (if needed): Finish the problem
- Check: Does my answer make sense? Did I include the unit?
Together, CUBES plus a simple step plan keeps students from rushing, and it cuts way down on “I did the math but still got it wrong.”
Over time, the organizer becomes less necessary because the habit becomes automatic.
That’s the goal.
And if we can lower students’ worry and stress during testing, that’s a definite win!
Common pitfalls (and simple fixes)
Pitfall 1 – They circle everything
Fix: Teach one rule:
“Only circle what you will use in your equation.”
Pitfall 2 – They keyword hunt
Fix: Repeat this line until it becomes part of their brain:
“The question is the boss.”
Pitfall 3 – Their markup is nice… but the work is a mess
Fix: Add a “track your work” routine:
- one step per line
- write smaller, not wider
- keep digits lined up
- box the final answer only
Readable work = fewer mistakes.
Quick Teacher Phrases for Marking Up Math
If you want this to become a habit, give kids consistent language. Here are my go-to lines:
- “Circle important numbers.”
- “Label your numbers.”
- “Underline what you’re solving for.”
- “Tell me your plan in one sentence.”
- “Show your steps like you’re teaching someone else.”
- “Does your answer make sense?”
Short. Repeated. Predictable.
That’s what sticks.
How to roll it out without it taking forever
This isn’t a 6-week unit. It’s a routine that can be reinforced daily.
Here’s a simple gradual release approach:
Day 1 – Model
- Do two word problems and think out loud.
- You mark up the word problem. Students watch.
- Keep it quick.
Day 2 – Do it together
- Students mark up the word problem with you.
- You guide with questions and repeat the same phrasing so students get used to it (“Underline the question – what are we finding?”)
Day 3 – Partner practice
- Students mark up word problems in pairs using a checklist
- You walk around and look for “circle everything” kids
After that, Make it the expectation
You don’t need to grade the markup, but you do need to build the routine into your math time.
Keep repeating:
“Markup the word problem first – then solve it.”
Once kids feel confident about what they’re doing, it will become automatic.
Be sure to review the steps during test prep season for students heading into state testing. Our goal is to slow students down enough that they stop and think instead of just grabbing numbers.
A tiny next step you can try tomorrow
Pick one word problem.
Have students circle the numbers, underline the question, write “I need to find…,” and make a quick plan.
That’s it.
You’ll be surprised how many “careless mistakes” disappear when students stop treating word problems like a guessing game and start reading them like pros.
Question – I’m not a fan of CUBES. What else can I use?
Totally fine. You don’t need CUBES (or CUBE) to teach students to read word problems well. The routine in this post does the same job without the acronym: circle and label the important numbers, underline the question, write “I need to find…,” make a quick plan, then solve and check. If your students can follow those steps consistently, you’re building the habit – with or without a catchy name.
If you do want to use CUBES (or you’re curious about how other teachers teach it), you can read more here:
⮕ Read about CUBE – CUBES Word Problem Strategy
Want to Read More?
Here are some articles that you might be interested in reading:
⮕ 5 Strategies for Teaching Math to Special Education Students
⮕ How to Solve Long Division Problems
About the Author
Written by Jules Rhee, MEd, and a 30-year teaching veteran; published 2/12/2026.
Jules is the creator of Caffeine Queen Teacher (CQT) – Visual Math Organizers + Graph Paper Support. She’s a veteran teacher with over 30 years of classroom experience (SPED, upper elementary, and middle school) and a Master’s in Education (MEd). Jules shares practical, classroom-tested ideas and creates step-by-step resources that help students stay organized, confident, and successful – especially with multiplication and long division.
Read more about Jules here: About Page | Browse resources here: TpT Store