



By Jules Rhee, MEd | Latest update 8/17/2026
If you ask your class to define “climax,” most kids can rattle off the definition, no problem. But if you ask them to identify the actual moment it happens in the story they just read? Half the hands would go down. That’s where having a plot diagram right in front of them helps.
You might know it as plot structure, plot elements, story mountain, or plot arc. It doesn’t matter what you call it; it does the same job.
And once it’s up on your wall, it’s not going anywhere. This isn’t a one-time-deal kind of poster. You’ll end up pointing to it during read-alouds, novels, even when kids bring up the movie they watched over the weekend.
What Is the Plot Diagram, Anyway?
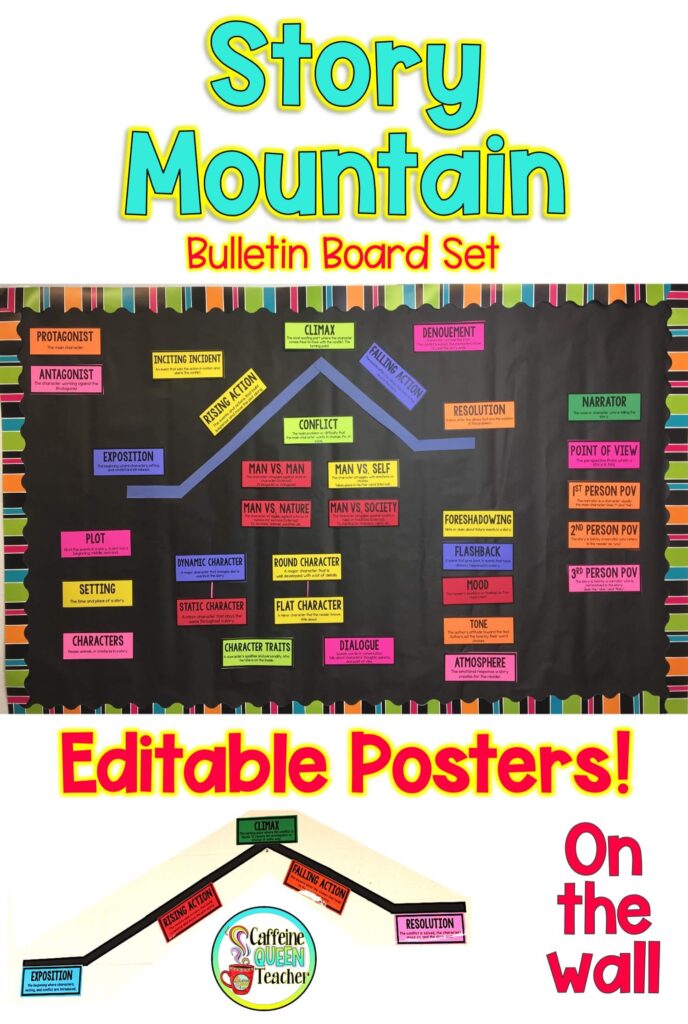
It’s a visual map of the five stages every story goes through: exposition, rising action, climax, falling action, resolution. Stick it on a wall or bulletin board, and suddenly “climax” isn’t just a vocabulary word anymore. It’s a spot on a shape kids can point to.

What Are the Big 5 Plot Elements?
A typical plot diagram breaks down into five stages, and here’s the thing: most stories follow this same arc, no matter what kind of story it is.
- Exposition: Unveiling Essential Background. This is where we meet the characters, the setting, and whatever background info the story needs before things really get going.
- Rising Action: Unleashing Conflict. The conflict kicks off here, usually with some kind of inciting incident. Complications start piling up fast as the main character heads toward the climax, and that’s exactly what you want your students watching for.
- Climax: A Point of No Return. This is the turning point. The character’s life changes for good right here, and everything the story’s been building toward finally collides. It’s usually the most intense moment for the character, and readers feel it too, excitement, worry, tension, all at once.
- Falling Action: Confronting Consequences. Now the character has to deal with what just happened. This covers everything between the climax and the story wrapping up.
- Resolution: The Final Chapter. Loose ends get tied up, and we find out how it all ends. A lot of times you’ll get a hint, or a flat-out description, of how the character’s changed by the end.
Try It With a Story Everyone Already Knows
Before you use this on something new, run through it with a story your whole class already knows cold. Cinderella works great.
Exposition is pretty easy. We meet Cinderella and learn about her miserable stepfamily situation right away. Then things start piling up in the rising action. The invitation to the ball shows up, the stepsisters destroy her dress, and the fairy godmother magically appears and fixes it. By the time it strikes midnight and Cinderella has to flee the ball, you’ve reached a major turning point in the story. After that, the prince searches the kingdom for the mystery girl who left the glass slipper behind. That’s falling action. Eventually, he finds Cinderella, the shoe fits, and the problem is resolved.
Do this with a story kids already know, and it clicks fast.
Don’t Interrupt the First Read
Here’s something I learned the hard way: don’t stop a first read to point out plot stages. Kids don’t like that one itty bit.
If you interrupt every few paragraphs to comment or ask, “what stage are we in?” you’ll kill the momentum. Kids stop enjoying the story, and they stop understanding it too.
Instead, read the story first. All the way through, or at least a solid chunk of the novel. Let kids react however they react, even if that means a chorus of “can we just keep reading?” Save the plot diagram work for after that first read. Let them read it and get into the story first. Then go back and talk about how the plot was put together.
Where Kids Usually Get Stuck
A few things I saw a lot:
Kids treat the stages of the story like they’re all the same size. They’re not. Rising action is almost always the longest chunk of any story, by quite a lot.
They also mix up “exciting” with “climax.” The loudest, most dramatic scene isn’t always the climax. The climax is the turning point. It’s the moment something happens that changes where the story is headed. And it isn’t always the loudest or most exciting scene.
Resolution gets treated like an afterthought. Kids will tell you how the story ends but skip right past why it ends that way. Push them to connect it back to what actually changed in the character.
Add In the Extra Terms You Need
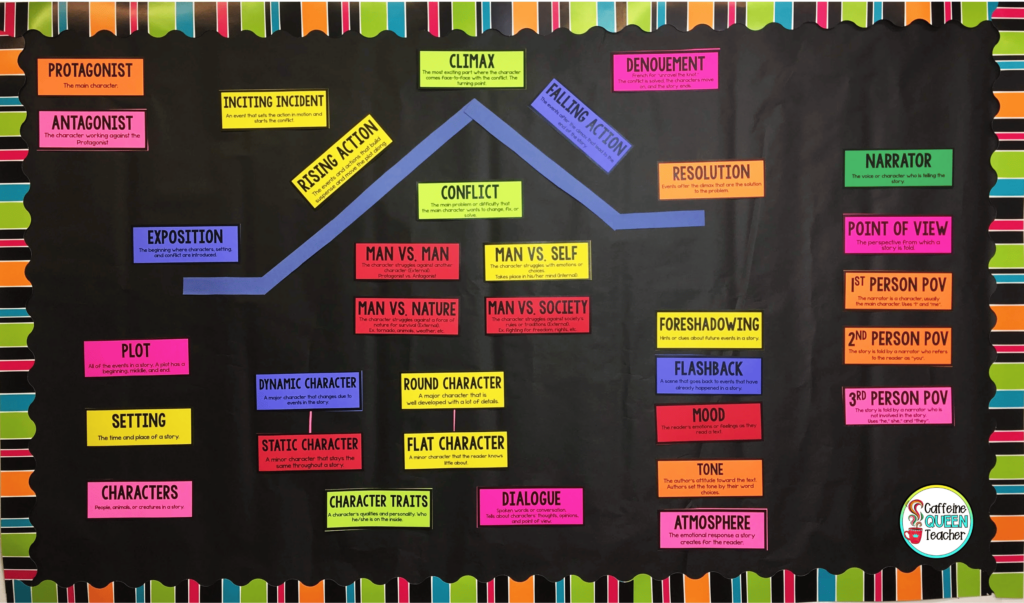
This set goes past the five main stages. You get more than 40 extra literary terms for your bulletin board: types of conflict, character types (protagonist, antagonist, dynamic, static, round, you name it), foreshadowing, flashback, point of view, mood, theme. All the term cards are editable, so add in whatever fits your grade level and whatever you’re teaching right now.
Setting This Up in Your Room
It comes in three sizes. If you’ve got a big wall, use it. If you don’t, there’s a smaller version that works on a bulletin board or magnetic whiteboard.
I mainly used the full wall version in my own room (I let it take up almost the entire back wall, and that’s kind of the point! Kids can’t ignore it).
I’ve also used the small size with magnets on the back for magnetic dry-erase boards, and I’ve used it on a bulletin board in my previous classroom. Use whatever fits your space.
Plus, the set includes EDITABLE term cards so you can customize your bulletin board to suit your lessons, grade level, and students’ needs.
To make the actual line for the plot mountain, I used construction paper to make a simple line. You can add peaks and valleys to your line to show complications if you choose.
Once students understand the plot of the story and the central ideas, you can ask other types of questions focusing on the author’s word choice, descriptions, purpose, and theme.
Use It During Read-Alouds, Too
Read-alouds are a great time to keep using the Plot Diagram without turning it into a whole separate lesson.
After you finish reading for the day, go back to the diagram and ask, “Okay, where are we now?” Let students decide if the mark or sticky note should be moved and explain why.
Sometimes they’ll disagree. That’s actually a good thing. One student might think you’ve reached the climax while someone else thinks you’re still in the rising action. Have them explain what happened in the story that made them choose that spot.
You don’t need to spend 20 minutes on it. A quick discussion at the end of your read-aloud keeps the plot terms fresh and gets kids used to thinking about how the story is changing as they read.

Where Can I Get This Resource?
Looking for the Plot Diagram Bulletin Board Set? It’s right here on TPT.
Click HERE to check out the BUNDLE on Teachers Pay Teachers that includes a set of color-coded graphic organizers and this EDITABLE set.
About the Author
Written by Jules Rhee, MEd, and a 30-year teaching veteran; published 9/9/2020; Latest update 8/17/2026.
Jules is the creator of Caffeine Queen Teacher (CQT) – Visual Math Organizers + Graph Paper Support. She’s a veteran teacher with over 30 years of classroom experience (SPED, upper elementary, and middle school) and a Master’s in Education (MEd). Jules shares practical, classroom-tested ideas and creates step-by-step resources that help students stay organized, confident, and successful – especially with multiplication and long division.
Read more about Jules here: About Page | Browse resources here: TpT Store

