


By Jules Rhee, MEd | Latest update 4/2/2026
You’ve taught the steps.
You’ve made the anchor chart.
You’ve taught it again, and then retaught it three times.
And still, some students forget where to start, lose track of where they are, or turn in a page of crooked numbers that even they can’t read.
Sound familiar? That’s exactly why I developed Shape Visual Organizers. They give students a color-coded, shape-based roadmap through every step, so they stop guessing and start solving. And they work especially well for 4th and 5th grade, struggling learners, and special education students.

I used this visual strategy to teach multi-digit multiplication and long division in my own classroom for years, and the response from other teachers has been tremendous! It works!
Understanding the Visual Organizers
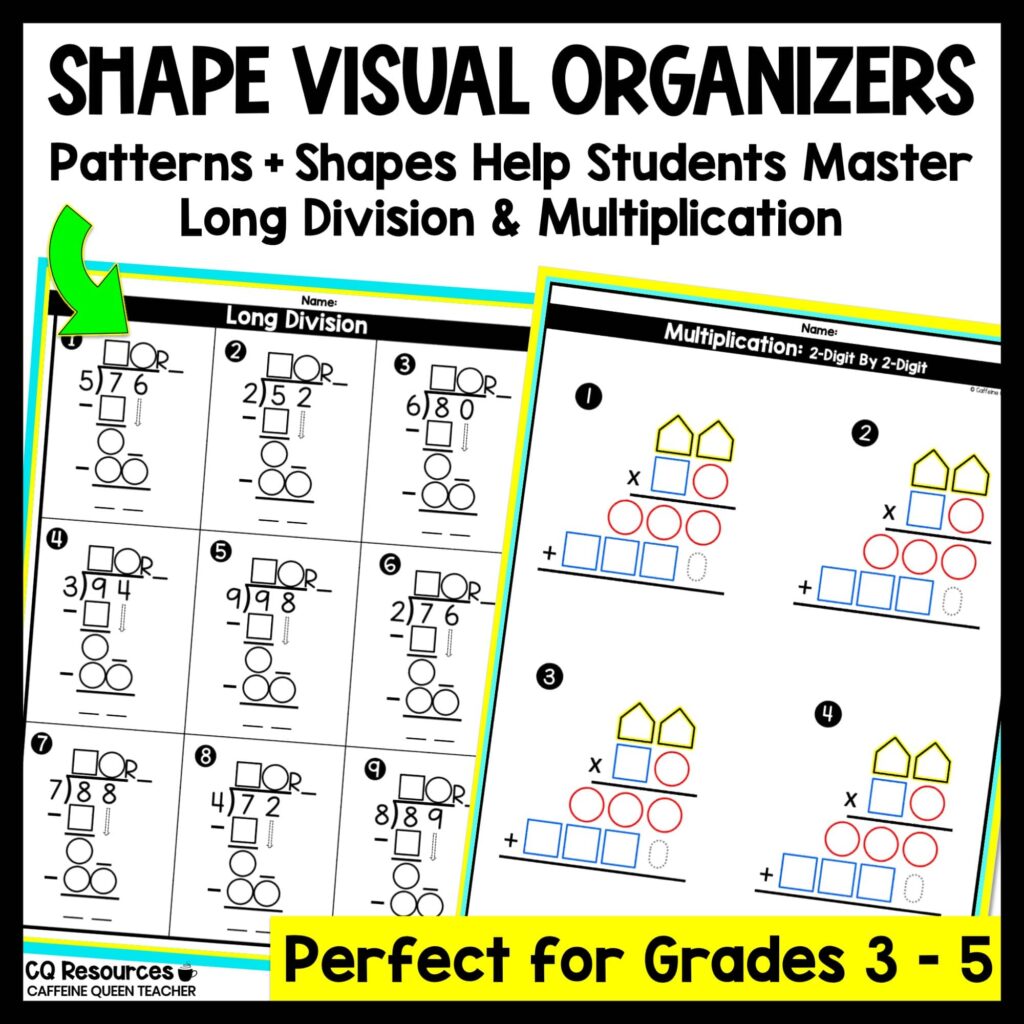
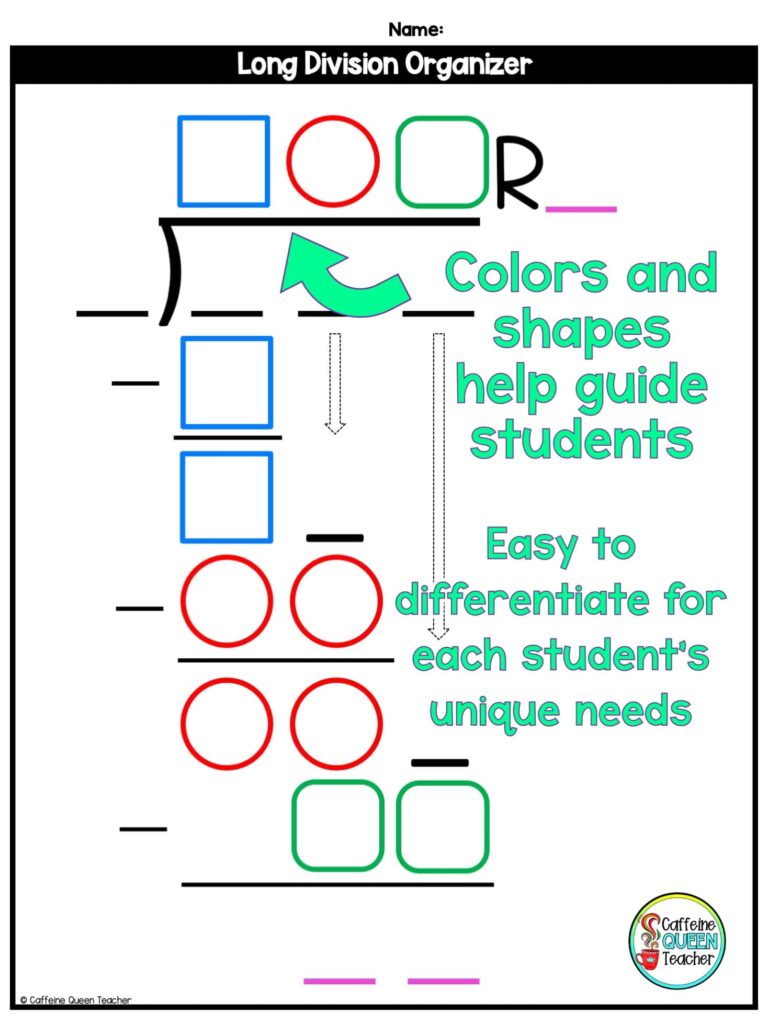
These shape organizers for multiplication and division use color-coded shapes to walk students through each step — helping them follow the sequence, line up numbers, and keep their work organized.
The shapes offer the right amount of visual structure until students feel confident enough to do the math on their own. Over time, they outgrow the scaffolding and don’t need the organizer at all. It’s a simple but powerful strategy that helps all learners succeed with long multiplication and division, especially struggling learners.
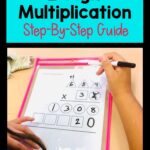
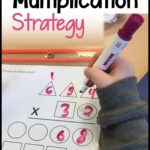
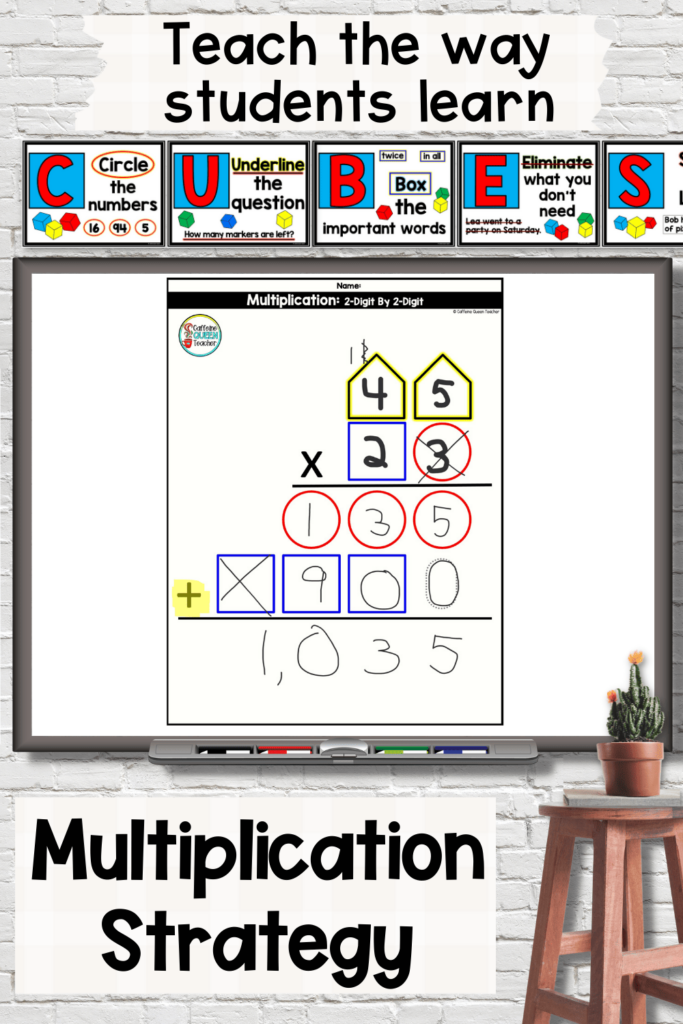
Here’s what the multiplication organizer looks like:
And here’s the version for long-division:
Step-by-Step Guide to Teaching with Shape Visual Organizers
Be sure to watch this quick video tutorial for step-by-step help teaching 2-digit multiplication using Shape Visual Organizers:
And if you’re teaching long division with the standard algorithm, this next video breaks it down using clear, visual scaffolding that your students will actually follow:
Strategies for Whole Group Instruction
I like to kick things off with a whole-group lesson using my SmartBoard (or any interactive whiteboard) so all students can see the organizer in action. From there, we shift into small groups and one-on-one support to reinforce the process using the same language and shapes.
How I Introduce the Organizer
First, I show students the organizer and point out the different colors and shapes. We talk about how these visuals help guide their thinking, kind of like a roadmap for solving multi-step math problems.
I always start simple. For long multiplication, I begin with a 2-digit × 1-digit problem. This helps students get comfortable with the organizer and the strategy before moving on to trickier problems like 2-digit × 2-digit.
Thinking Out Loud
As I model the steps, I think out loud so students can hear my reasoning. I might say something like:
“Now I need to multiply the 5 in the one’s pentagon by the 3 in the red circle…”
As I speak, I point to each shape and number, filling in the organizer in real time. This helps students connect the visual cues to the actual math process.
I would model this a few times while asking guiding questions like,
“What do I multiply next?” or “Where does the number go after I regroup?”
Students Follow Along
While I’m modeling at the SmartBoard, students follow along at their desks using their own organizers. I love using dry-erase markers with clear plastic sleeves. It makes the activity feel interactive and low-pressure. Plus, it keeps the organizers reusable for ongoing practice and review!
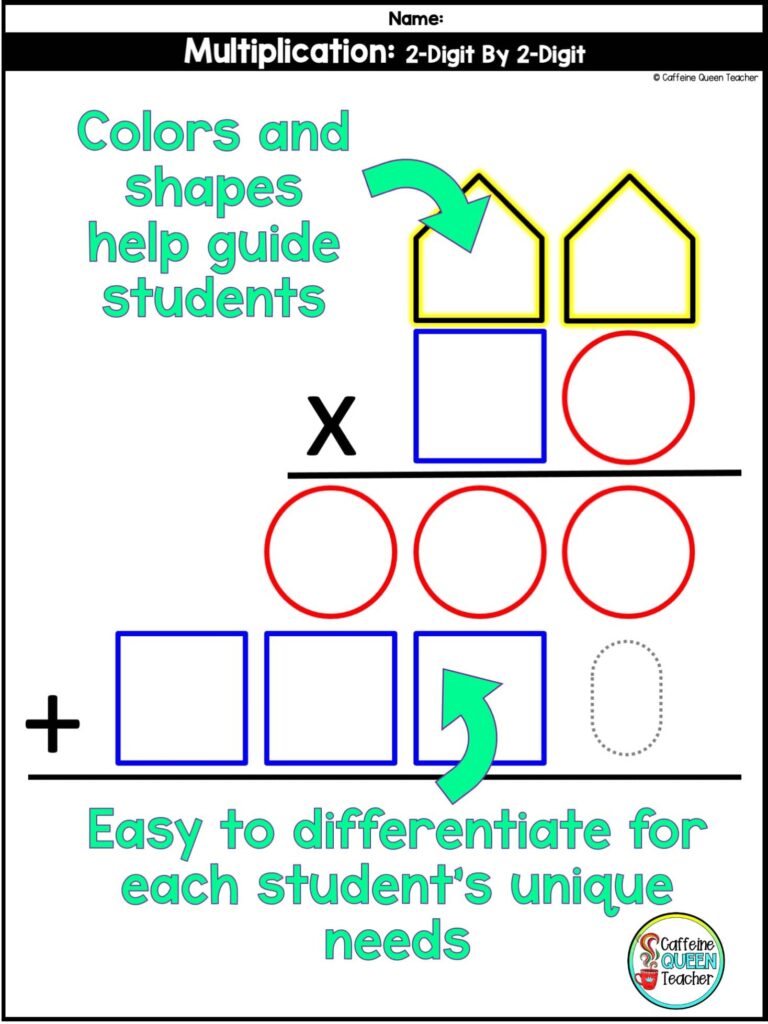
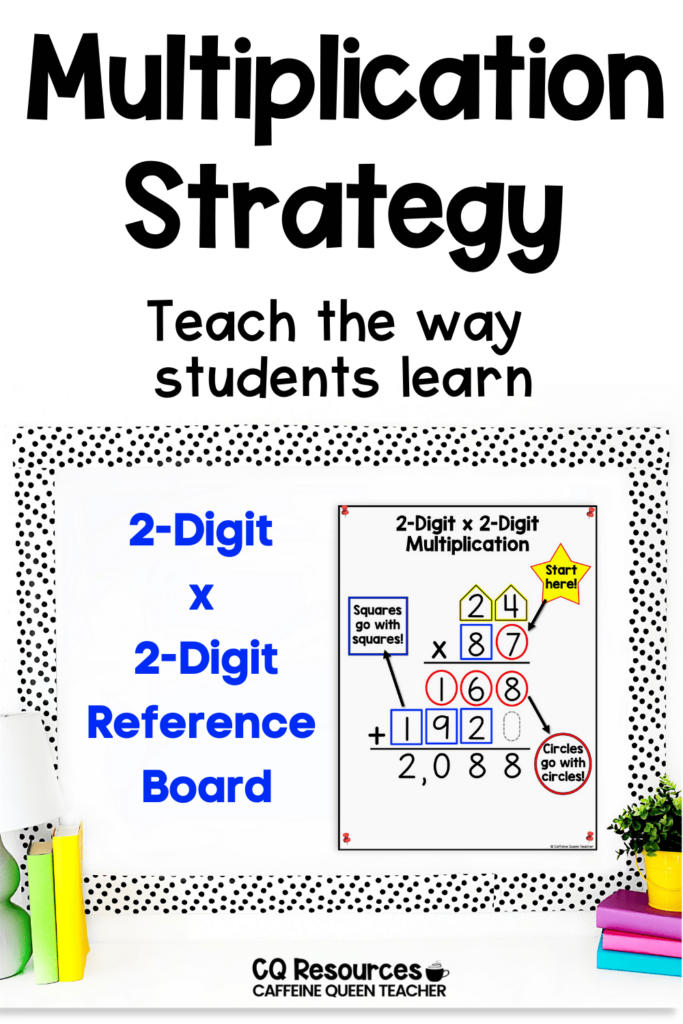
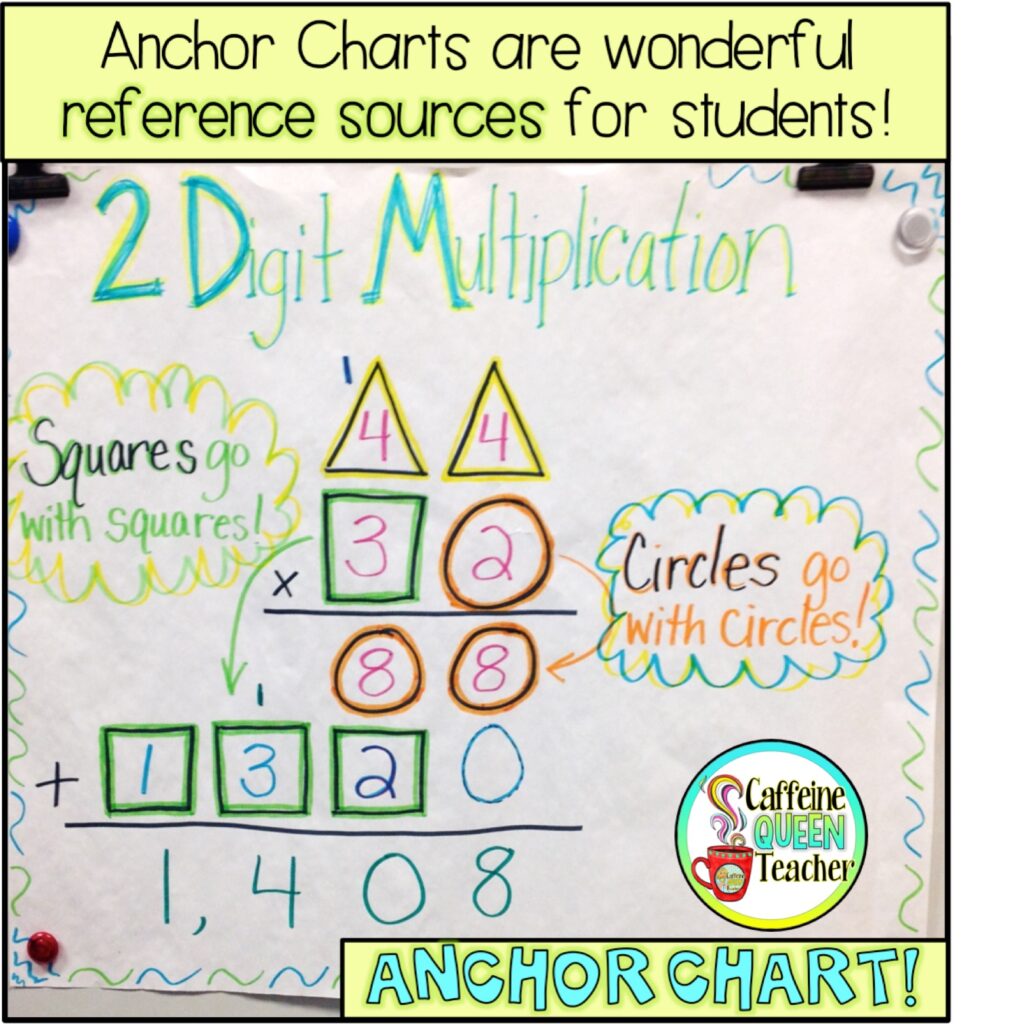
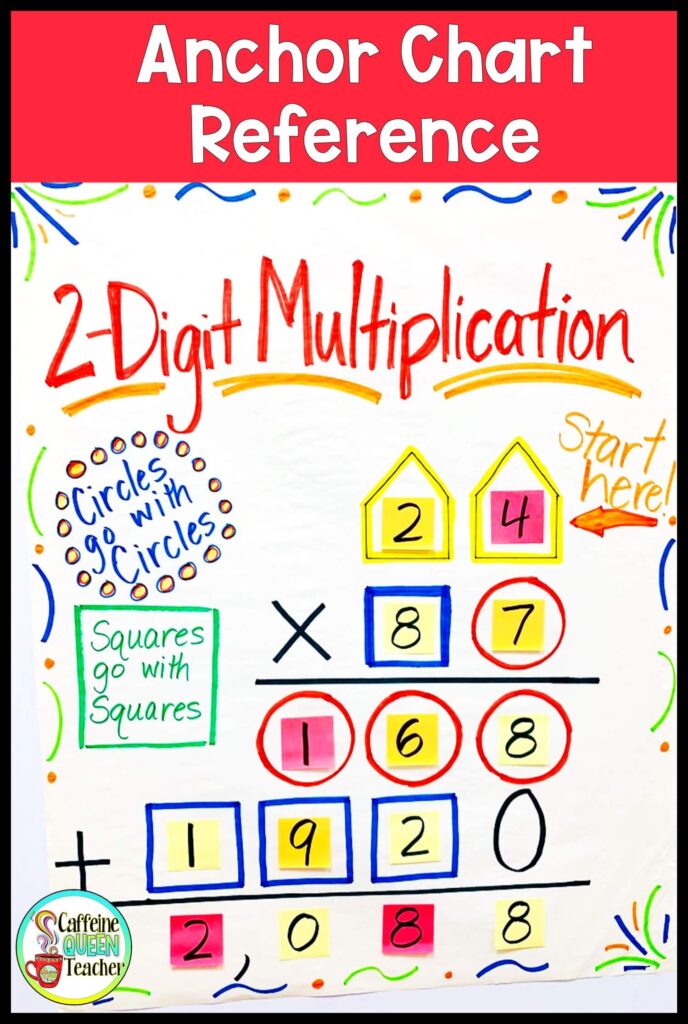
“Circles Go With Circles, Squares Go With Squares“
This part is key, and it’s one of the first visual patterns I teach when using Shape Visual Organizers for long division and long multiplication.
In the example below, you’ll notice that any digit multiplied by the 3 in the red circle has its product written directly underneath… inside the red circles.
That’s why I repeat (like a broken record):
“Circles go with circles!”
The same goes for squares. If a number is multiplied by the 2 in the blue square, the product belongs in the blue squares underneath.
“Squares go with squares!”
The long division organizers work the same way. The organizers create a visual pattern that students quickly begin to trust. Reinforcing these patterns helps students stay on track and makes multi-digit multiplication and long division feel more predictable and manageable.
Even when we transition away from the color-coded version and start using black-and-white organizers, that structure still sticks. The routine becomes automatic, and students learn.
Focused Learning in Small-Groups and One-on-One Instruction
After our whole-group lesson, students begin working independently on their long multiplication or long division assignment using the worksheets with built-in organizers or grid paper.
As they work, I do a quick walk-around to see who’s cruising and who’s getting stuck. That’s when I either pull a small group to the back table for extra support or offer one-on-one help right at their desks. These visuals make it easier to see exactly where students need help and what they’re getting stuck on.
Differentiating Instruction with Colors and Shapes
The Shape Visual Organizers build in differentiation for you. The color-coded shapes offer enough structure for students who need support, and the supports are easy to fade out when students are ready.
How to Differentiate Using the Organizers
- Start with the full-color organizer for students who need step-by-step guidance
- Transition to the black-and-white version with shapes only
- Then move to graph paper worksheets without shapes or colors
- Eventually, students are solving problems independently — no scaffolds needed!

You can customize this progression for each learner.
For example, if a student struggles when the colors are removed, you can use markers to add them back in temporarily. It’s a simple way to offer on-the-spot support while they’re still gaining skills.
This built-in scaffolding makes it easy to support every student without needing different types of resources. It builds confidence gradually and helps students see and understand long multiplication and division in a way that makes sense to them.
We know that when students feel confident, they’re more engaged, take pride in their work, and truly start to understand the process.
These print-and-go long multiplication and long division worksheets and organizers cut down on your prep time and keep your to-do list short.
Using Anchor Charts to Support Learning
I LOVE anchor charts – they’re easy to create and absolutely fabulous as visual reference tools for students.
Creating a Long Division Anchor Chart

When it comes to long division, I like to keep things fun and memorable — and what’s more memorable than McDonald’s?
I use this student-friendly mnemonic device:
- Does (Divide)
- McDonald’s (Multiply)
- Serve (Subtract)
- Cheese (Check)
- Burgers (Bring down)
- Really? (Repeat and start over)
I used to teach the classic “Division Family” version, Daddy, Mommy, Sister, Brother, Rover, but switched to the McDonald’s version to be more inclusive and relevant to today’s classroom.
- Daddy, (Divide)
- Mommy (Multiply),
- Sister (Subtract),
- Brother (Bring Down),
- Rover (Repeat and start over).
2-Digit Multiplication Anchor Chart
Here’s one of my go-to anchor charts for teaching 2-digit multiplication using Shape Visual Organizers. I keep it displayed during lessons and small-group time so students can refer to it as they solve problems independently.
Using It in the Classroom
Sometimes I’ll have a long division problem posted as morning work, with a sticky-note anchor chart already up on the board.
As students solve the problem, I can swap out the numbers easily by just changing the Post-Its. (I try to stay color-coordinated… but let’s be honest, real life happens.)
And you know what?
Students LOVE working on the anchor chart. They like changing the numbers, moving the sticky notes, and explaining the steps to their classmates.
That tiny job becomes a big confidence booster and helps reinforce division skills in a way that’s hands-on and easier to learn and remember.
✅ Want to Try These Organizers in Your Classroom?
If you’re ready to bring structure, confidence, and visual support to your math class, you’ll find these organizers to be the perfect addition.
Click here to explore the Shape Visual Organizer sets for multiplication and division on TPT
These organizers are GREAT for 4th & 5th grade students, special education, IEP and RTI (Response to Intervention) groups, guided math, small group and whole class instruction, and struggling or reluctant learners.
I’m confident that math will feel easier for your students and way less stressful for you!
Frequently Asked Questions
What grade level is this method best for?
Shape Visual Organizers work especially well in 3rd, 4th, and 5th grade, but I’ve also used them successfully with middle school students who need intervention support. If a student is struggling with the standard algorithm, these organizers can help at most any age.
What if a student regresses when I remove the colors?
That happens, and it’s totally normal! Just grab a marker and add the colors back in temporarily. The goal is confidence, not speed. You can always re-introduce the scaffold and try fading it out again a little later.
How do I help students who can’t keep their numbers lined up?
This is one of the most common struggles with multi-digit multiplication and long division, and it’s exactly why I also recommend graph paper as an intervention tool. The built-in grid does the lining-up work for students until their spatial awareness catches up.
Do students still need to memorize multiplication facts to use these organizers?
Yes, the organizers help students with the process of multi-digit multiplication and division, but they still need to know their basic facts to work efficiently. I’d recommend building fact fluency alongside this method, not instead of it.
What’s a good mnemonic for remembering the long division steps?
My favorite is the McDonald’s version: Does McDonald’s Serve Cheese Burgers Really? — which stands for Divide, Multiply, Subtract, Check, Bring Down, Repeat. Kids remember it instantly, and it gives them a reliable sequence to fall back on when they get stuck.
Articles about Long Multiplication:
- The Science of Math: A Better Way to Teach Long Multiplication – Learn the science of math and how to use it to teach multi-digit multiplication.
- 3 Ideas for Teaching Multi-Digit Multiplication – Here are 3 FAST ideas for teaching multi-digit multiplication. These interventions are easy and quick for busy teachers.
- 2-Digit Multiplication Worksheets: Differentiated – Here’s a visual method for teaching 2-digit multiplication using differentiated visual cues to guide students’ learning for success.
Articles about Long Division:
- Differentiated Long Division Worksheets for FREE – Grab these differentiated long division worksheets for FREE and dramatically boost student success and your teaching success!
- How to Solve Long Division Problems – Refresh your memory with this step-by-step strategy for teaching long division to students with easy-to-understand tips and ideas.

Please follow me at my Teachers Pay Teachers Store, Pinterest, and Facebook if you found this article useful! I’d LOVE to hear from you!
About the Author
Written by Jules Rhee, MEd. and 30 year teaching veteran; Published 6/11/2016; Most recent update: 4/2/26.
Jules is the creator of Caffeine Queen Teacher (CQT) – Visual Math Organizers + Graph Paper Support. She’s a veteran teacher with over 30 years of classroom experience (SPED, upper elementary, and middle school) and a Master’s in Education (MEd). Jules shares practical, classroom-tested ideas and creates step-by-step resources that help students stay organized, confident, and successful – especially with multiplication and long division.
Read more about Jules here: About Page | Browse resources here: TpT Store